Wednesday, March 23, 2011

Snausages


For my birthday this year, E gave me a meat grinder and a sausage stuffer. I was wicked excited. Honestly, it may have been the best gift he has ever given me. He doesn't have a great track record of picking out things like jewelery or clothes, so food stuff is an easy way to go. We had been planning on making sausage since I unwrapped these bad boys, but then things got in the way. Now that we have nothing to do but sit around and wait for Baby Bean, this weekend was perfect for testing out our sausage making skillz.

It was a learning experience, but totally fun and really not that hard! Start to finish it took us three hours, but most of that time was spent on the couch while we waited for meat to chill in the freezer. In the end, our sausages were delicious, and we'll definitely make more. Next up? Buffalo chicken sausages, 'cause yeah, we're kind of obsessed. We started with this recipe and tutorial from Hank Shaw of Hunter Angler Gardener Cook and did a tiny bit of tweaking with the help of our Kitchen Aide book and what we had (or more accurately, didn't have) in our pantry. We went to visit the super sweet butcher at our Whole Foods and asked for 4 lbs of pork shoulder and 1 lb. of pork fat. Of course, the smarty pants told us that a pork shoulder will probably have enough fat on it for sausage without adding anything additional, so he just gave us a 5 lb. pork shoulder and called it a day. He was totally right. It was perfect.

Sweet Italian Sausage
Ingredients
5 lbs. pork shoulder
3 1/2 Tbls. kosher salt
3 Tbls. sugar
1 1/2 Tbls. fennel seed
1/2 Tbls. cracked black pepper
1 tsp. nutmeg
1 cup fresh parsley, minced
1 head garlic, peeled and minced
3/4 cup sweet white wine
1/4 cup white vinegar

Equipment:
Meat grinder and 2 large metal bowls
Stand mixer (optional)
If you want to make links: Hog casings, sausage stuffer, rack for hanging sausages to dry

Preparation:
1. Put your bowls, meat grinder, and pork in the freezer for at least an hour before beginning.
2. Remove pork from freezer and chop into 1 inch chunks. Place in one large metal bowl, cover with plastic wrap, and return to freezer for an hour.
3. Remove pork from the freezer, add salt, sugar, fennel seeds, pepper, garlic and parsley and toss quickly to coat. Cover and return to the freezer for 30 minutes. 


4. Measure out wine and vinegar and place in the refrigerator. Assemble meat grinder. If you will be making links, rinse your casings in a bowl of lukewarm water and let them soak while you work.


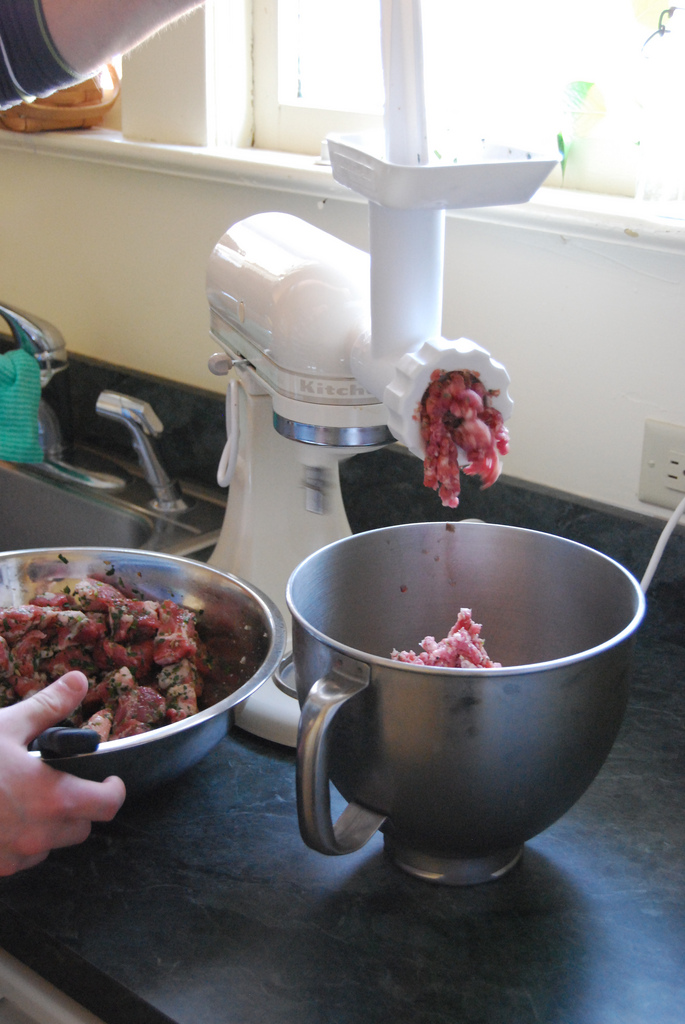
5. Working in batches if necessary, process pork mixture through your meat grinder into your second chilled bowl. If you use the Kitchen Aide attachment, set it to level 4 and use the coarse grinding plate. Once all of the pork is ground, return it to the freezer for 15 minutes.


6. Remove ground sausage from freezer and add wine/vinegar mix. If you have a stand mixer, mix the sausage for 2 or 3 minutes on the lowest setting until it begins to get sticky and bind itself together. If you don't have a stand mixer you can use your hands or a wooden spoon, it'll just take longer!

7. If you are not making links, you are now done! Cook up some sausage for a sauce, make patties and fry it in a pan, or pack it up in your freezer. If you want to make links, stick it all back you know where. Rinse your hog casings well in lukewarm water and set up your sausage stuffer attachment. Grease it up with some shortening and slide a casing on, leaving 5 or 6 inches hanging off the end for tying later.

8. Now this part is tricky, and it takes a bit of getting used to. It was a two person job, I did the sausage scooping and E worked with the casings. I definitely recommend looking at Hank's photos for guidance and going from there! Remove sausage from the freezer and start scooping it into the top of your stuffer attachment while using one hand to slip the casing off the stuffer. It will come out in one large coil. At the end of the casing, leave another few inches empty for tying. 

9. Tie one end of your casing into a tight knot. With two hands, measure out the size of your link, squeeze it tightly towards the knot (but not so tightly that you bust the casing!) and twist it towards you four or five times. Measure out the next link, squeeze it tightly, and twist it AWAY from you. Continue down the coil, alternating your twists between links, and tie off the other end. Now check your sausages for air bubbles. If you find any, prick them with a toothpick.

10. Hang sausages on a rack to dry  for an hour or two. If you'll eat them within a week, store them in an airtight container lined with paper towels. If not, freeze them!

Friday, March 18, 2011

An Update and A Sneak Peek


I have not done a shop update in a long while, partly because (oh yeah!) I'm lazy, but also because I haven't had a chance to list anything new and exciting in a few weeks! I've been busy finishing up a custom order for my friend Shannon's September wedding. I love love doing wedding invitations; making mine were what got me started down this Etsy path in the beginning. I was so excited when I found out that Shannon was getting married and that I got to make her invitations for her. She's a girl after my own heart, wanting something eco friendly and stylish with personal flair. Together we created these Tree of Love invitations complete with initials and printed on plantable paper. As in paper you can stick in a pot of soil and water and it will bloom into a bunch of flowers! How cool is that? 


I've also been spending my spare time doing anything under the sun to initiate labor, even though I know Baby Bean will only arrive when he is good and ready (and he isn't technically due for a week). I've been told that anything from eating pineapple and spicy foods, to lots of sex, walking, and pedicures can do the trick. The only thing I will absolutely not be doing is drinking castor oil, no matter what anyone says. Blech! But hey, if you have any other ideas, toss 'em my way, would ya? 


I also squeezed in a little crafting time since we are all finished with the rest of our baby prep. I used some of the leftover fabric from Bean's bedding to make this bitty bunting to hang on the shelf above his changing table. Cute, huh? Takes all of 15 minutes, and I won't even bother you with a tutorial since there are probably tons floating around the blogosphere. I can't wait for my mom to arrive with the bedding she made so that we can finish his nursery and show everyone! 

Also the Handmade Gift Guide's weekly voter is now open! Drop by and choose your favorite featured item of the week; all it takes it a click! The winner gets to be a featured shop on the Guide and gets ad space for the next week. Every little bit helps when you are a newbie! I'm #86. :)

Wednesday, March 16, 2011

Boozy Treats for Preggos


I don't get to drink my favorite St. Patrick's Day drink this year. And no, I don't mean green beer. I mean the offensively titled Irish Car Bomb, which we can't even order in our favorite Irish Pub back in RI because the owners refuse to serve it. It pisses them off and I totally get it. However, that wouldn't have stopped me from popping into any other Irish Pub on St. Patrick's Day (or any other day, who am I kidding?) to chug down one or two or four of those delicious concoctions. They taste just like coffee milk. (Don't feel bad if you have never had coffee milk, it's a Rhode Island thing, albeit one worth every creamy swig if you can get your paws on it.) You can get an Irish Car Bomb almost anywhere these days, but I am forced to abstain unless the Baby Bean decides to do right by his mama and get here today. Cross your fingers for me and the massive amounts of spicy food I've been consuming all week.

To soothe my cravings, I've revamped my old recipe for Irish Car Bomb Brownies. I still refuse to make brownies from scratch, despite my success with those amazing Bon Appetit Brownies. I'm just too lazy. Plus, St. Patty's Day is tomorrow, and in case you have only a few minutes to throw together a party dessert, these are your best friend. People will love you for them. Bring along the leftover Irish Cream (if there is any, that is!) and they'll love you even more. Just make sure you don't eat them all yourself.

Marbled Irish Cream Brownies

Ingredients:
1 box of Ghirardelli Double Chocolate Brownie Mix
1/4 c. Samuel Adams Chocolate Boch (or you can use a stout)
1/3 c. vegetable oil
1 egg
4 oz. softened cream cheese
1/8 cup heavy cream
1/4 cup Irish Cream
scant 1/2 lb. powdered sugar


Preparation:
Preheat oven to 325 degrees. Line a 9x9 glass baking dish with foil and spray with cooking spray.


In a medium bowl, beat cream cheese until fluffy. Continue beating as you slowly pour Irish Cream into the mixture. Don't worry if it looks curdled, it will smooth out! Once incorporated and smooth, add cream, beating constantly. Slowly add sugar (1/2 cup at a time), beating constantly. Set aside. 


In another medium bowl, whisk egg with oil and beer until combined. Add brownie mix and stir until just combined. Pour brownie batter into the prepared pan. Spoon cream cheese mixture onto the top of the brownie mix and swirl with a knife to marble. Bake for 60 minutes or until a tester inserted in the center comes out with a few crumbs stuck to it. (Slightly underbaked is always better than overbaked for brownies!)


Cool completely in pan. Remove from pan and slice into bars with a knife dipped occasionally into hot water and wiped clean. These are fudgy and can be messy to cut!


This post is linked to:
Hearth and Soul
Fresh Clean and Pure Fridays
Friday Potluck
504 Main
Tidy Mom

Wednesday, March 09, 2011

Time Flies

Seriously. I can't even believe that we are almost at the end of our journey through preggo land. Baby Bean is due in two weeks. TWO WEEKS! Although I'm hoping for a St. Patty's Day birthday, just because that would be awesome, both for him and for my lady bits. Homeslice is already 8 lbs. Yowza. We've been crazy busy with all of the "last minute" prep that goes into being fully ready for a baby's arrival, really important stuff like:
Taking belly photos...

Opening baby gifts...

Working on super secret baby name crafts...

Shopping on etsy...
(Print from jolinne, a shop full of adorable illustrations!)

and today I'm making my playlists for Labor and Delivery. I hope to have at least 8 hours of music in addition to what we already have on my iPod, mostly relaxing stuff to keep the mood mellow. 
That's where you all come in! 

What is your favorite song for relaxing? 

Friday, March 04, 2011

The Leftover Queen and a Giveaway

Nothing makes me happier than using up all of the leftovers in my fridge to create something cozy and comforting that is also healthy. Since the lovely folks from Pillsbury and MyBlogSpark sent me some Pillsbury goodies, and I had a ton of roasted turkey in the fridge, I knew a pot pie was in order. This one is creamy, with a hint of sweetness, and so easy to throw together! It makes a huge pie, so make sure you have company coming or else you love pot pie so much you can eat it daily until it's gone. I can. And did, yup.


Turkey Pot Pie
Ingredients:
2 cups cooked turkey, chopped or shredded
1 small onion, diced
2 medium carrots, peeled and chopped into 1/4 inch pieces
2 small sweet potatoes, peeled and chopped into 1/4 inch pieces
1 cup peas
1 cup chicken stock
1/2 cup milk
1/8 cup flour
3 Tbls. butter
2 Tsp. fresh parsley, chopped
1 tsp. dried thyme
1 tsp. dried tarragon
salt and pepper
1 egg
2 Tbls. cream
1 can Pillsbury Crescent Rolls


Preparation:
Preheat oven to 375 degrees. Whisk egg with cream and set aside. Melt butter in a large saute pan. Add onion and sweet potatoes and cook until onion is translucent, about 5 minutes. Add carrots and cook another 3-5 minutes. Stir in flour and cook 1 minute. Stir in milk and stock and cook until thickened, about 6-8 minutes. Stir in peas, parsley, thyme, tarragon, turkey, and salt and pepper to taste. Pour mixture into a large (think 9x13) baking dish. Roll out crescent roll dough and pinch edges together. Cover baking dish with the dough and pinch edges to the side of the dish. Slash slits into the top of the dough to allow stream to escape and brush with egg wash. Bake for 15 to 20 minutes or until pastry is golden brown and sauce is bubbling. Serve immediately.


And of course, that's not all, folks! Thanks to Pillsbury and MyBlogSpark, I get to give away the same prize pack that I received. Here is the apron, recipe book and pen that is part of the prize pack:


This giveaway is open to U.S. residents only who are 18 years and older.  The giveaway will run through 3/11/2011 at 11:59 PM Eastern.  Winner shall be chosen via Random.org.

Mandatory entry:  Visit the Pillsbury Bake-Off site, then come back and tell me which recipe you want to try out.  You must leave your email or acknowledge that your profile has it listed if you are on Blogger.  I need a way to reach you if you win.


Additional Entries: Please leave a comment for each!
1. Follow this blog via Google Friend Connect
2. "Like" Jojobean Designs on Facebook and leave your name in the comment
3. "Heart" Jojobean Designs on etsy and leave your user name in the comment
4. Follow me on twitter and tweet this giveaway, leaving the link in the comment


Keep in mind: There's still time to enter to win Pillsbury's 45th Annual Pillsbury Bake-Off! Between now and April 18, 2011, you can enter your own recipes at www.bakeoff.com.  Of all that enter, 100 lucky finalists will compete for the grand prize.  Those finals take place March 25 through March 27, 2012 in Orlando, Florida.  Please visit the website for more information about this contest, the official rules, prizes and how your creation will be judged.  


Disclosure:  Pillsbury, via MyBlogSpark, provided me with the prize pack listed above, as well as information about the 45th Annual Pillsbury Bake-Off.  The opinions are 100% my own. 


This post is linked to:
Friday Potluck
Fresh Clean and Pure Friday